Gmail is undeniably one the most widely used web-mails worldwide. Though it has a lot of features it can boast off, it does lack some functionality that many users would love to have. For example ability to sort email by sender, date etc., are missing.
One such most requested feature in Gmail is read-receipt. It’s currently available but only to Google Apps account holders (Business, Education, and Government).
Consider a scenario: You have bought a product online for which you have been charged additional. You have sent out an email to concerned vendor asking for refund of your extra charges. So, how would you know that they have received/opened your email?
Solution: Simple answer is to use read receipt.
Currently there are many third-party email tracking tools that lets you get this feature in your Gmail account. But the question of privacy always comes to mind. Though it’s available in-built in Google Apps Gmail account, what about the Gmail users? How would they use this feature?
Introducing Gmail Read Receipt Notifier:
With this in mind I have come up with a tool that lets you create your own email tracking system which will send you notifications when someone has read your email. This tool can be used by any Gmail user or non-Google Apps account holder for their own purpose. The data you provide will entirely be private to your account. Below are instructions on how to get started.
Get Read Receipt Notification for your Emails in Gmail with Google Docs
Step 1: Installing and Setting up the Application
- Log-in to your Google Docs account.
- Now click here to make copy of Gmail Read Receipt Notifier V2 app. Click Yes, make a copy.
- Wait for few seconds for the menu Read Receipt to appear next to Help. Select Authorize App from it. Now click OK in the popup and finally click accept.
- Select Tools-> Script Editor.
- Now from select File -> Manage Versions, Click save new version and press OK.
- Publishing your app: Select Publish -> Deploy as web app. Under Who has access to the app select Anyone, even anonymous.
[Updated on Dec-23-2013 – Version 2 Released]

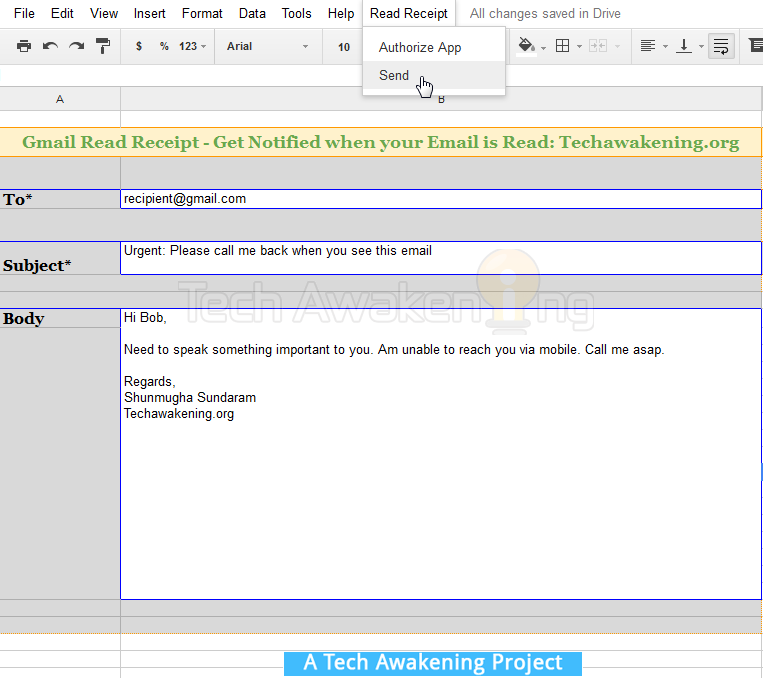
Step 2: How to Use the Application
- Start composing your email.
- Enter recipient email at cell B4, enter subject at B6.
- Enter body at cell B10:B26.
- Once you are done. Select Read Receipt -> Send. For the first time alone you will be prompted for your Gmail ID. Enter a valid ID. This will not be known to anyone except you. So you need not worry about it.
- Again select send from Read Receipt menu. Your email would be sent.
- Now on whenever this email has been read by someone you will receive an email alert to your Gmail ID with the time-stamp on when it was read.
Tip: To enter new line (enter) in the body press CTRL + ENTER
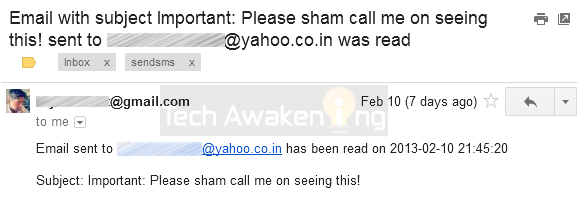
How to test it out?
- Send an email to someone using this tool.
- Now log-in to recipient email account from a new browser. E.g. Use Firefox in-case you used Google Chrome/Internet Explorer to send out that email.
- Open the received email.
- You should get an alert in your Gmail inbox stating that the email was read like the above screenshot
Now on find out who actually speaks truth and who does not 😉 So did you like the tool? Are you stuck at any step or unable to get it working? Feel free to drop in your comments, views and suggestions!
Thanks so much. I’have been waiting long ago for such posibility. Using spypig was not always worked, except if I was using chrome, because of html. 😀
My pleasure!
Just to ask, where is stored sent email using this script? It is not in the send label in gmail. Not even in the google drive. 🙁
Thanks for the immediate feedback! A workaround coming up this weekend 😉 Will let you know once done. Cheers! Do share the article.
Thanks also for your work, and I am waiting for the update 😀 For now the script is doing the job very nice, just as I said the sent emails are not remembered anywhere.
Again thanks for the feedback, feels good to hear it from the user themselves! 🙂
[…] Prinzipiell funktioniert die Lesebestätigung mit den oben genannten Einschränkungen aber einwandfrei und kann bei Bedarf relativ schnell und einfach auch in Gmail umgesetzt werden. [via, Quelle] […]
I noticed that when I read the persons reply that I get another read receipt, in fact any time that email is opened by either myself or the person it was sent to, I get another read receipt, is there a way to only get a read receipt when the person the email was sent to opens the email and not when i read their reply, also the time stamp in the key archives page is 1.5 hours off, how can I adjust the time? Other than that, thanks so much for your hard work, been searching for something like this for a long time
Jeff,
Thanks a lot for the feedback. Did you provide your Gmail ID in the popup that comes up? This is done especially to address the problem you have mentioned to stop alerts from being generated when the sender themselves read the mail. As far as key archives is concerned it just inserts the current time-stamp, not sure if it’s timezone problem.
Go to Tools-> Script Editor then File-> Project Properties. Under Info tab see if time zone is proper and you can also check under Project Properties tab to see if your email id is there(to ensure former problem is addressed)
Mean while do share and like this article if you liked it 😉
Thank you very much for the tip!
I have a problem: the menu “Read Receipt” does not appear next to menu “Help”, so I cannot step further. Do you know why might this happen?
Thanks in advance and continue the good job!
Van
After making a copy of the sheet, menu should appear in few seconds.
Or manually trigger it as follows: Tools-> Script editor then Run-> onOpen. Now you should be getting the menu.
Can u plzz tell me where the send email is been store ?
or how to recover send email ?
Abhijeet,
There is a fix coming up this weekend to address this issue. Meanwhile do share this article on the web if you liked it 😉
All,
Sorry for the delay!
Tip.. I modified your scripts tracking pixel to display as 1×1 so it’s not visible to most email clients.
line 137:
var tracker=””;
This hides the pixel all together from the page.
I also would note (to those that are not aware) you can’t use the type face settings in google docs for this script (unless I’ve just not figured it out).
However, you can send an html email through the cell. This, is AWESOME! 🙂 Although you have to use single quotes where double would normally be used in tags. but, AWESOME! 😀 else cancel out the double or write it as hex or another method in your email.
Additionally, my testing revealed that you want to enter your entire email address for the Gmail ID. Just entering the user name will cause a new (or has caused) a new pixel count.
An enhancement (in addition to “where did the email you sent go?) would be to log the opens to the spreadsheet instead of sending you an email. And or create a spreadsheet for each email so a count can continue for each open (displaying the first and so on for better tracking).
If you accidentally open your email and it DOES track you, then you have to remember that and subtract it from the original recipient.
I might also consider changing the email “unique key” to the Subject Line, that way they are likely always unique (based on that) and it makes google docs database tracking easier as you can search for the subject line or a portion of it to find counts – not to mention removing an extra step.
Lastly (for now) if you (users) want to send to multiple people using this, you can by using a comma, however it seems to break the tracking all together. 😐 One at a time. 😉
GREAT script though! Lots of potential!
Thecolor,
Thanks for your valuable feedback and suggestions!
– Regarding sender opening his own email and notification being sent. This is problem is addressed by asking the Gmail ID. If it matches, alerts will not be sent.
– Logging tracked data onto Spreadsheet is good but people like me are lazy to go look into the sheet 😉 Hence the reason I went for the option of sending out email alerts.
– Yes as of now we will be able to track one user. But very much possible to track multiple people provided we iterate and assign unique identifier to each of the user.
Thanks for your words. And for taking time to share your awesome thoughts!
Cheers 😉
Im a newbie coder but I love this tool. I’d really like to know how to modify this to send to multiple recipients, basically a mail merge, and then add read receipts for each individual. Can you advise? Would love any insight! Thanks!
seems the addition script got cut off… lets try this again with less detail, just the addition…
border= singlequote 0 singlequote height=singlequote 1 singlequote width=singlequote 1 singlequote style= singlequote display colon block semicolon font-size colon 0px semicolon singlequote
no spaces of course between the punctuation.
Sent mail are still not available , right ??
How to get sent mails..??
Thanks for reminding! Will try coming up with fix this weekend 🙂 Cheers!
Hi everyone
I am 75 years old and desperately need a confirmation of read receipt application for gmail.com. However, not being very computer literate I am finding it difficult to setup the techawakening prog.
Can anyone give me the instructions on how to in old mans plain English?
Cheers
Gerry
Hi Gerry,
Thanks for writing in, I would love to help you out in setting up the things. We can have one on one conversation. You can request for support here: https://gumroad.com/techawakening#NKWm
Hi,
I tried to use this. Seems, the recipient has to click on the “Display Images Below” and then only the read receipt is sent? Is there a way this can be removed?
Thanks,
Avi
Avi,
In desktop browser it’s the default behavior and where as in online mail client if the sender’s email ID is already in contact list of the receiver this will not happen.
Hello Shunmugha,
I am very grateful for your work! I am running the Tools-> Script editor then Run-> onOpen but am yet not recieving a pop up or any information saying my email has been opened.
I have been sending to another email account and that works perfectly, I also see in the keys archive that my mail has been sent out, but nothing coming in showing the email was opened from the other account.
Most grateful to you.
Karen,
Thanks! You will actually be receiving a notification saying that email was opened via email not pop up alert.
Very grateful for your resonse Shunmugha,
however, I am not finding any notification emails either in my inbox or spam filter. Would the recipient be who I sent the email to?
Yours,
Hi Snunmugha-
Is there a way to include an attachment (doc, pdf, etc.) in the email sent?
AKA,
Thanks for writing in. Sorry the current version of the script does not support it.
What might be the reason why I am not getting the email? I was sure to publish the application.
Ah- now I just sent one to a real friend who opened it and I did get an email? Why not when I send to one of my other accounts as a self test? I must be cursed!
Ah- now I just sent one to a real friend who opened it and I did get an email as a receipt notification. Why not when I send to one of my other accounts as a self test? I must be cursed! I am opening the email from those accounts.
Grateful, just befuddled 🙂
Ah! Good to hear. Finally some good news 😉 Is your test account a Gmail account or ?
The first self test account is an ATT.net account
The second, a private college with an .edu
My friends account that worked is an old fashioned gmail.
This is awesome site.
I had learnt a lot here.
Thank to Shunmugha Sundaram.
Hve a nice day.
My pleasure 🙂 Do stay connect by liking our FB page: https://www.facebook.com/techawakening
Great article. And amazing that you put this together. I love it. I started something similar. It’s always great to get feedback. You can check it out at http://www.contactmonkey.com. Email tracking and read receipts for Gmail and Outlook. As a salesperson it’s always great to know when I’m top of mind with my leads. I can then pounce on the phone and call them.
Great work Shunmugha!
Scott,
You are most welcome 🙂 Looks promising! Will give it a go and share my feedback’s.
Sounds great Shunmugha. I look forward to hearing your feedback!
Check out MxHero Chrome extension – toolbox.mxhero.com . It’s completely free with unlimited messages and a ton of powerful features. It has a great Read Receipt capability even after the recent Google image changes.
Error “Couldn’t not store data to DB
Writing to ScriptDb is disabled. For more information, see: https://developers.google.com/apps-script/migration/script-db” occurred ????????
This needs code update will let you know once it’s done.
Getting this error on Gmail Read Receipt script
Couldn’t not store data to DB. Report at http://techawakening.org/?p=1988Exception: ScriptDb is disabled. For more information, see: https://developers.google.com/apps-script/migration/script-db
Stan,
Ya it’s a bug. Will be pushing a fix soon. Will notify you asap.
Stan,
It’s fixed! Released Gmail Read Receipt Notifier V2 now. Please start over with the steps. With this version, key is auto generated you need not enter it manually. Hope you like it. Do share your feedback’s.
Love this tool, very useful in so many ways. I had great success using the tool up to last fall, when I stopped getting notifications of old emails being read. I just tried to use the app again and I get an error message pasted below for reference.
ReferenceError: “ScriptDb” is not defined.DetailsDismiss
I see similar questions above, but not sure if they are the same error? Any way I can keep my db of sent mails and continue to get notifications they have been read? It looks as though I may need to upgrade to version 2 of the app and I assume that would mean losing the db of my sent emails?
I have re-authorized the app, and published it as directed, but for some reason it no longer works. I am not sure what changed, but any guidance would be most appreciated!
Thank you!
That’s great to know. Yes you need to use the latest version.
Yep, if you use the latest version it will be a fresh start since Google removed support for DB, we won’t be able to retrieve old data. But please check keys_archive sheet that logs all you sent out. If you have backup there I can help you in merging existing data to version 2. Write to admin@techawakening.org for support. Cheers!
Good Morning,
Thank you for the support. I was able to download the new version and it works awesome.
If possible, I would like to continue to get notifications for messages I sent with the old version and wondered if it is as simple as copying over the data from the original files Keys_archives tab to the new file?
I did copy all of he data from version one keys tab into the keys tab of version two, but it doesn’t seem to report when one o the older messages has been read. If I understood your Note above correctly, there is a way to merge the data.
Any guidance appreciated!
Thank you,
It’s not just copying the old data. Problem is that new version is not referring key tabs at all. Will require some code change to manually push the old keys to new DB.
Please spread the word, would really appreciate if you could like or share this article.
I understand, thank you for the response. I would be happy to share the article, but not sure how to do that…
Just below the article title there are social network icons, you can click on them.